- Gmail
- block contacts gmail
- mute gmail app
- turn out office
- update phone number
- write email gmail app
- change password gmail
- change recovery email
- set dark mode
- turn dark mode
- block sender gmail
- undo sent mail
- stop unwanted emails
- delete emails gmail app
- outlook account gmail app
- designate gmail app
- google chat gmail app
- send hyperlink gmail app
- outlook gmail app
- sound gmail app
- labels gmail app
- update promotions gmail app
- verification gmail app
- get notifications gmail app
- update the gmail app
- block email gmail app
- unsend email gmail app
- insert signature gmail app
- date birth gmail app
- email unread gmail app
- send videos gmail app
- delete history gmail app
- mark read gmail app
- forward gmail app
- trash gmail app
- move folders gmail app
- folders gmail app
- recovery gmail app
- yahoo mail gmail app
- email date gmail app
- snooze gmail app
- sync settings gmail app
- encrypt gmail app
- view gmail app
- compose gmail app
- make call gmail app
- get gmail safari
- address gmail app
- read gmail app
- autofill gmail app
- find unread gmail app
- office 365 gmail app
- delete promotion gmail app
- office gmail app
- font size gmail app
- unsubscribe from emails gmail
- theme gmail app
- cache gmail app
- off sync gmail app
- sign out gmail app
- see archived gmail app
- delete unread gmail app
- remove account gmail app
- hyperlink gmail app
- archived in gmail app
- add gmail app
- accounts gmail app
- download gmail app
- delete sender gmail app
- contacts to gmail app
- recall gmail app
- google meet gmail app
- swipe gmail app
- change notification gmail app
- attach file in gmail
- mark gmail app
- select all gmail app
- gmail home screen
- text color gmail app
- sort gmail app
- yahoo gmail app
- storage gmail app
- edit contacts gmail app
- sharing gmail app
- delete email gmail app
- how to chat on gmail app
- promotions gmail app
- number gmail app
- notification on gmail app
- disable gmail app
- filter gmail in app
- text gmail app
- searches gmail app
- name gmail app
- individual gmail app
- delete in gmail app
- background gmail app
- profile gmail app
- password gmail app
- unread emails gmail app
- image gmail app
- trash in gmail app
- attachment gmail app
- access calendar gmail app
- change signature gmail app
- archived email gmail app
- signature gmail app
- auto sync gmail app
- unmute gmail app
- date gmail app
- images gmail app
- video chat gmail app
- archive gmail app
- whitelist gmail app
- old email gmail app
- video gmail app
- conversation gmail app
- canned gmail app
- view calendar gmail app
- gmail app light mode
- pdf gmail app
- pin email gmail app
- settings gmail app
- color gmail app
- uninstall gmail app
- delete member whatsapp community
- create whatsapp community
- link whatsapp group
- unsubscribe gmail app
- archived gmail app
- unread on gmail app
- view contact gmail app
- trade license uae
- how to enquire trade name in uae
- contacts gmail app
- sync gmail app
- calendar events uae
- apply job uae
- call gmail app
- file gmail app
- filter gmail app
- outlook email gmail app
- font gmail app
- hotmail gmail app
- view email gmail app
- cc gmail app
- second email gmail app
- calendar gmail app
- attachments gmail app
- notification gmail app
- undo gmail app
- unblock gmail app
- reply gmail app
- dark mode gmail app
- ads gmail app
- sender gmail app
- account gmail app
- sort unread gmail app
- sort email gmail app
- invite gmail app
- unread gmail app
- delete gmail app
- search gmail app
- spam gmail app
- refresh gmail app
- email gmail app
- meet tab gmail app
- bin gmail app
- attach image gmail
- add account gmail app
- compose email in gmail app
- delete social gmail app
- create group gmail app
- delete account gmail app
- change language gmail app
- change dark mode gmail app
- search trash gmail app
- format font in gmail
- change default font gmail
- sort emails in gmail
- search by date gmail
- Delete sent email Gmail
- Mark read Gmail
- filter emails gmail
- Attach folder Gmail
- Group in Gmail
- export emails gmail
- Add link Gmail
- Forward Gmail Account
- archived emails gmail
- Change Gmail password
- send email gmail
- sign out gmail
- create gmail signature
- Email to G Group
- font size gmail
- delete all emails
- view unread mails
- unsubscribe emails gmail
- switch gmail accounts
- search in gmail
- print email gmail
- fax in gmail
- empty trash gmail
- delete old emails
- create g email list
- change background gmail
- send group email
- link gmail accounts
- schedule email gmail
- remove g accounts android
- recall gmail email
- archive mails gmail
- delete g profile pic
- create group gmail
- delete gmail account
- deactivate gmail account
- attach an email in gmail
- attach file gmail
- create gmail account
- cc feature gmail
- delete folder gmail
- create folders gmail
- change gmail address
- reset gmail password
- change signature Gmail
- gmail password iphone
- change password mobile
- block user gmail
- add signature gmail
How to add a signature in Gmail
Signature in Gmail is the text in 2-3 lines who basically use at the bottom of the mail. It is really useful in professional work to make your work faster and can connect well with your clients and employees easily.
It includes your name, company, phone number, website and anything you want to add. You can easily add a signature in Gmail.
Steps to add a signature in Gmail:
You can add your signature text in Gmail on your desktop and mobile app. This service is applicable in both scenarios.
How to add a signature in Gmail App
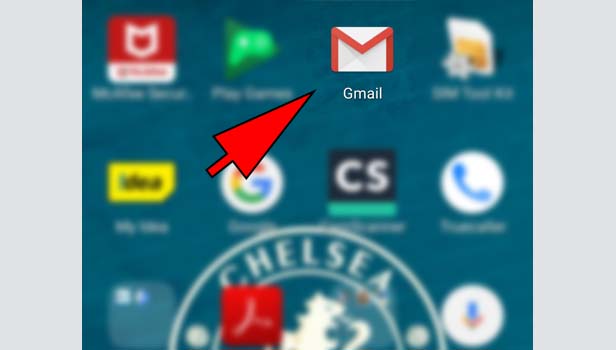
- Open Gmail: Open your Gmail app in your device and sign in to your account.
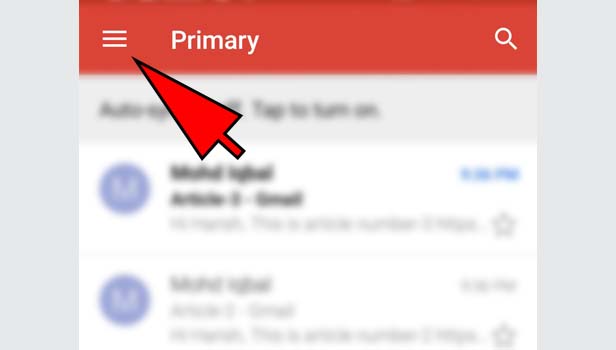
- Tap on three bars: Tap three bars menu option at the top left corner.
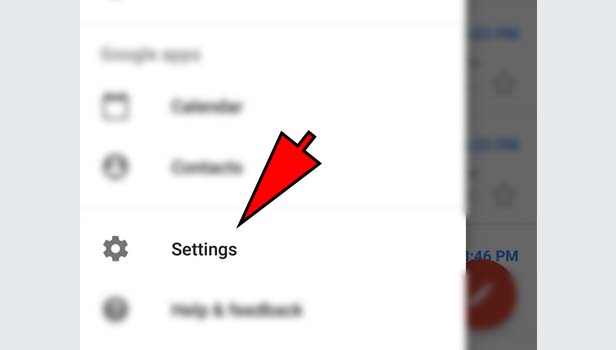
- Tap ‘settings’: Scroll down and tap ‘settings’ at the bottom.
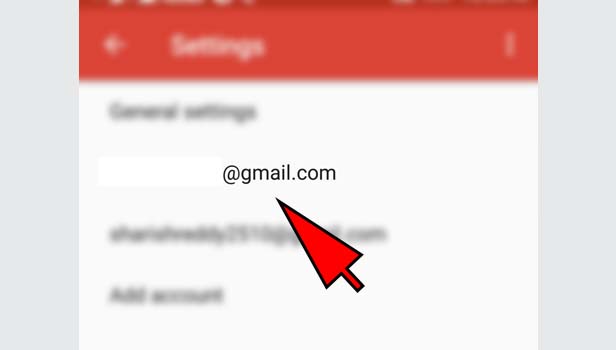
- Select your account: You will see your mail ID on the top. Tap on it to confirm.
- Tap ‘signature settings’: Scroll down and tap ‘signature settings’ option.

- Swipe left to start process: You see an option ‘mobile signature’. Swipe left the bar at the right corner.
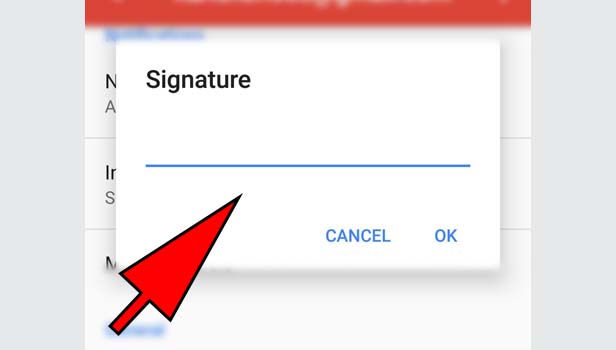
- Type your signature: Now type your signature text in box. Your text has been set. You can now get back to your app.
How to add a signature in Gmail on desktop
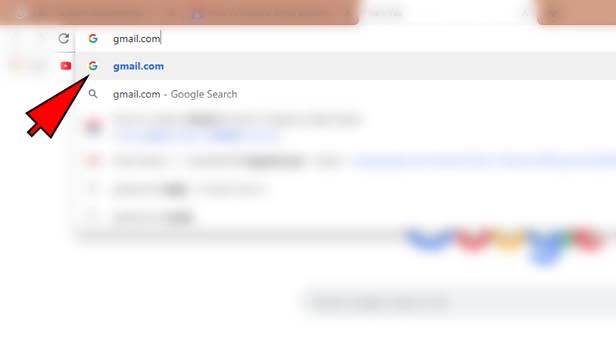
- Open the browser: Open your preferred browser on your desktop.

- Open Gmail: Open ‘gmail.com’ website and sign in to your Gmail account.
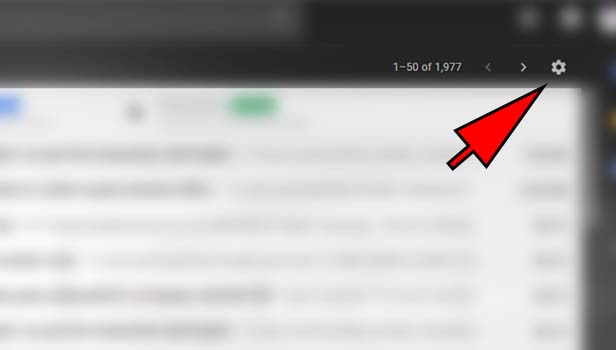
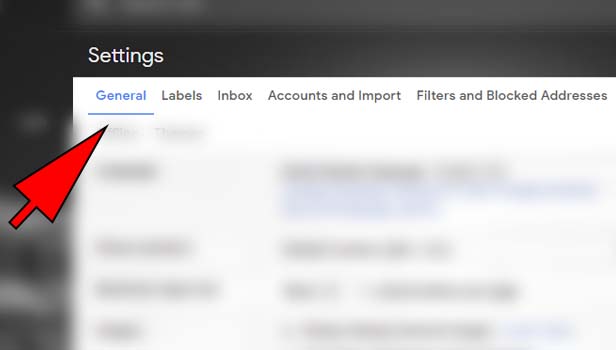
- Tap the settings icon tab: You will see an icon of settings at the top right corner. Tap on it.
- Tap the ‘settings’ option: Tap the option of ‘settings’ in all options.
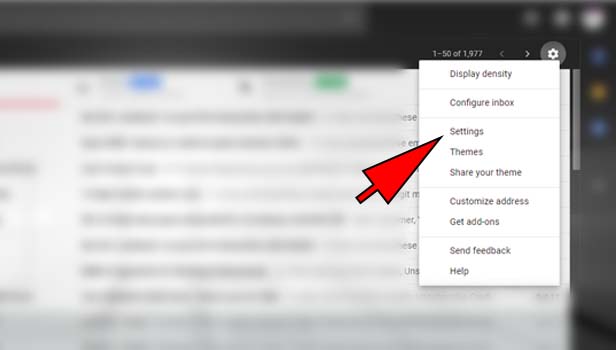
- Go to ‘general’: Settings will open from the ‘general’ automatically. If not, then open general which is the first option in horizontal line at the top.
- Find ‘signature’: Now you will see some general settings in this page. Scroll down and you will find the option of ‘signature’ in left corner.
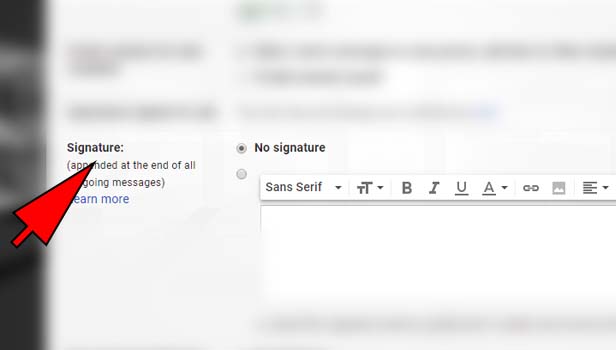
- Enable the signature: Tap on the second option below the option of ‘no signature’ there. You have enabled the signature option.
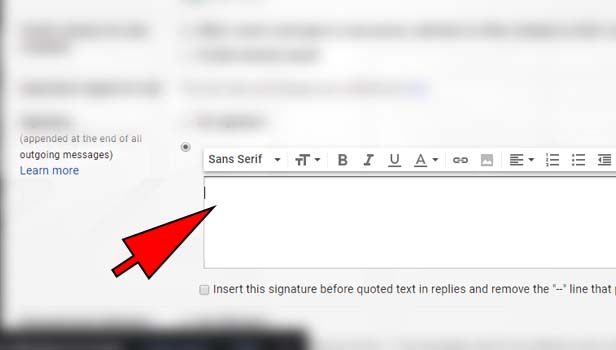
- Type the text: Now type your signature text according to you in the type box. You can use fonts, size and other options to make it attractive.
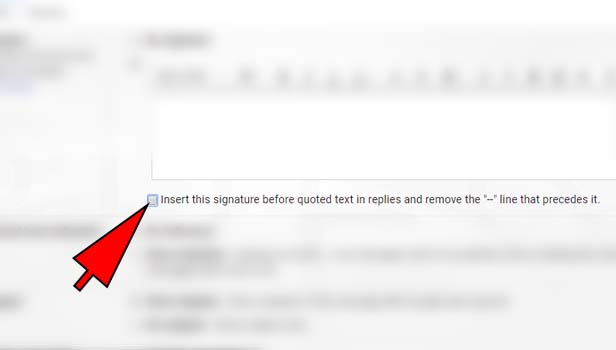
- Tap on the line below the box: You see a line after your text box - Insert this signature before quoted text in replies and remove the "--" line that precedes it. Tap on it to confirm it. Now your text will be added in replies as well. If you don’t want to add your signature in replies, then leave it.
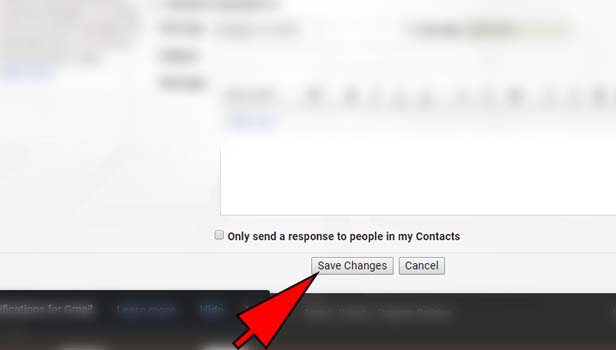
- Tap on ‘save changes’: Tap on ‘save changes’ option at the bottom to confirm the signature text.
Now your signature text has been set. Whenever you compose a mail or give a reply to someone, you will see this text at the bottom. You can change the signature at any time.
If you want to add signature text on your replies, then choose the desktop version. This feature is not available in your mobile app.
Related Article
- How to Sync Gmail App
- How to Get Dubai Calendar of Events in UAE
- How to Apply for a Job in UAE
- How to Call on Gmail App
- How to Attach File in Gmail App
- How to Add Filter in Gmail App
- How to Add Outlook Email to Gmail App
- How to Change Font Style in Gmail App
- How to Add Hotmail to Gmail App
- How to View All Email in Gmail App
- More Articles...