How to Wrap Text in Google Sheets
To make your Google sheets look more presentable, we would advise you to wrap any text in Google sheets.
When you wrap or text in Google sheets, then the Google sheets application to makes the text fit the cell. In this way, it becomes more organized and better-looking. You can also insert a formula in an entire column in Google sheets. These are only a few of its amazing features. Let us now learn how to wrap text in Google sheets in 7 easy steps with the help of the article written below.
Wrapping text in Google Sheet
Wrap Any Text in Google Sheets in 7 Steps
Step-1 Open Up Google Sheets: Like any other Google sheets process, this one also starts with you opening up the Google sheets.
You can either create a new Google sheet or also open an existing one with the help of its link. For that,
- Go to your web browser.
- Then, paste the link to the Google sheet that you want to open.
- Search for it and the sheet will open up.

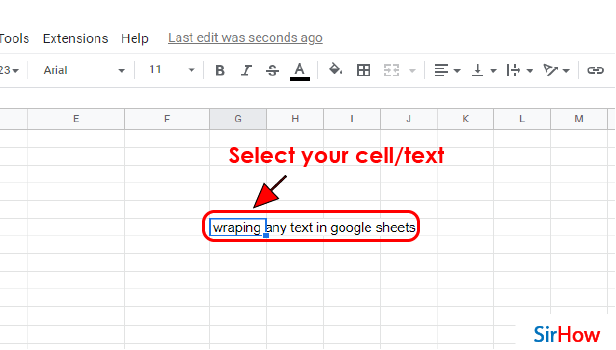
Step-2 Select The Cell to Wrap Text: Now, the next step of this technique is,
- Click on a cell.
- Then, write any text that you want. Make sure that it is at least of 5-6 words.
- Now, select that cell.
Step-3 Click Here as Shown: There are lots of options given on the top menu bar of the Google sheet as you can see in the picture given below.
From these options, click on the option which is shown in the picture below.
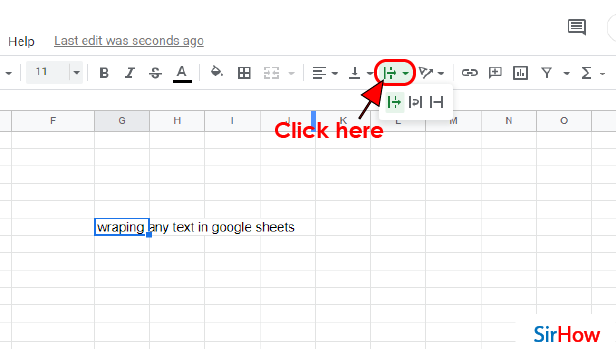
Step-4 Click On The Middle Option: Now, from the three options click on the second option. You can see the icon of the second option in the picture attached to this step.

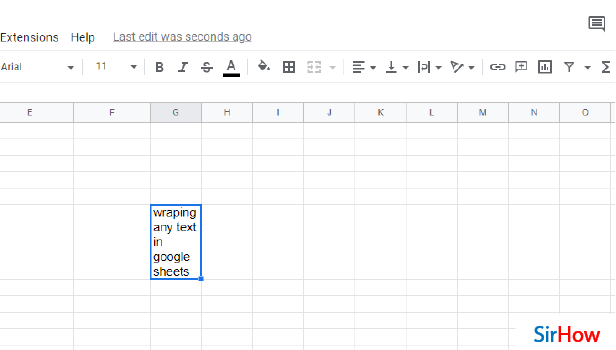
Step-5 It is One Way to Wrap Text: After clicking on the second option, you will see that the text of the cell is wrapped successfully.
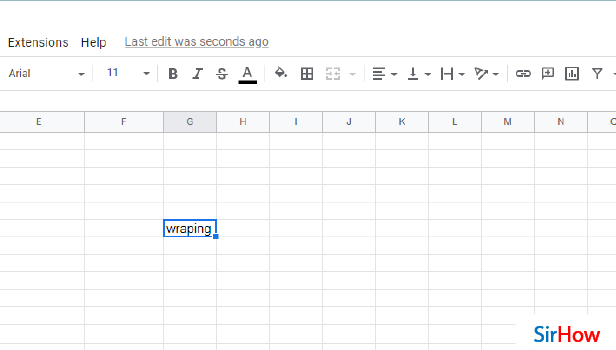
Step-6 Or, Click Here As Shown: In the previous two Steps we have learned one way of wrapping any text in Google sheets. But, there is one more way to do so.
In this way, instead of clicking on the second option, you have to click on the third option as you can see yourself in the picture below.

Step-7 This is Another Way to Wrap Text: You can perform this second way on any other cell also. And, you will see that your Google sheet has wrapped the text in the cell for you.
FAQ
Can I Wrap Text in Multiple Cells At The Same Time in Google Sheets?
For the time being, Google sheets have not yet created a shortcut key or a function with the help of which you can wrap the text of multiple cells at the same time.
- Still, to make your job easier, you can either go through the 'Format' tab or use the button on the toolbar to wrap the text.
- You can also select all the cells of either one row or one column and then perform the wrapping option by using the Format Tab.
How Can I Wrap Text in iOS on Google Sheets?
If you are using Google sheets on your iOS instead of Windows, then also the process for wrapping text remains the same.
But, on iOS or Mac devices, there is also a shortcut key that will help you to wrap the text of any cell with the help of your keyboard. The key is 'Ctrl+Option+O' and then press the 'W' key.
- 'Ctrl+Option+O' opens up the format Tab.
- And, the 'W' key chooses the 'Wrap' text option from the tab.
Is It Possible To Expand Cells to fit Text in Google Sheets?
In Google sheets, you can expand the cells in order to make the text in them fit the cell.
Go through the following steps to learn how to expand cells to fit text:
- You have to force point your cursor at the top-right of the column to be adjusted. It is the point over the line that separates the columns.
- Then, just double-click your mouse while the horizontal arrows are displayed.
- Now, your column will automatically adjust to fit the text.
How Can I Make Everything fit in the Cells in Google sheets Without Expanding A Particular cell?
If you want to make the text of the information in each and every cell of your Google sheet fit to its size without expanding or wrapping, then comes the 'Resize' option.
You can manually set the size of your cells in Google sheets. You can also make all the cells of your sheet the same size. In this way you can make the Google sheets cells fit text.
Google Sheets has become an inseparable part of academic and professional life. The cells of Google Sheets are identical in size and remain as it is even if the text goes beyond its size. But sometimes there is a need to view the entire text together. In such a case, you need to wrap text in google sheets. Don't worry, it is very easy.
Another Method
When the text exceeds the cell size, it is seen stretched over other cells on Google Sheets. But the text hides when you try to insert something in the cell next to it. It is advised to activate the text wrapping feature to avoid this. You will be able to read your entire text altogether with this.
Wrap Text in Google Sheets in 5 steps
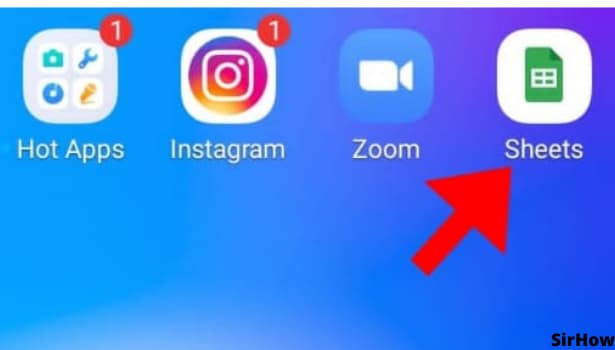
Step 1: Open Google Sheets App: On your mobile phone, click on the icon of Google Sheets. It would look like green paper folded from the top right corner. It also has a square divided into four parts as shown in the image below.
Step-2 Tap on any Cell to Wrap: Once you open Google Sheets, you can tap on any cell whose content exceeds the size of the cell. You can wrap text in Google Sheets for the whole document or specific row and column.
- You can also select the entire row (horizontal) by double-clicking on the numbers on the side or the entire column (vertical) by double-clicking on the alphabets at the top.
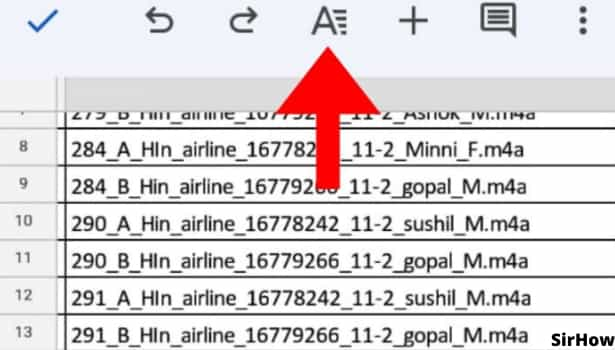
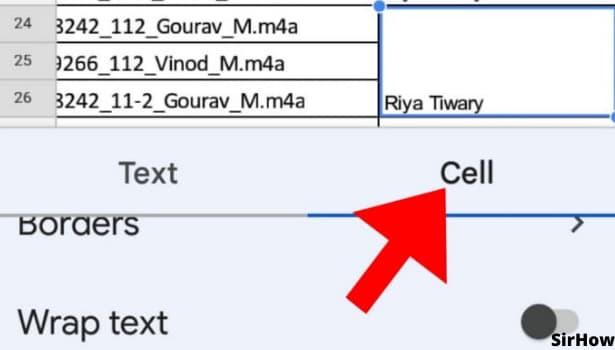
Step-3 Tap on A Icon that You Would See On the Top: On the top before the plus sign, you would see capital A with lines on its side. Click on that. Once you do that, a dialogue box will appear at the bottom showing two main options Text and Cell that suggest Text editing and Cell editing.
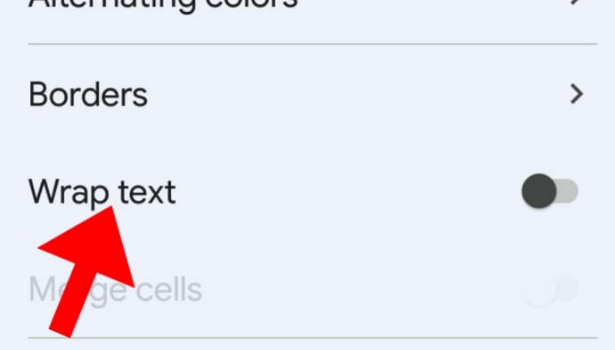
Step-4 Click on Cell Option: As we want our cells to wrap text, select the option of the cell. In that option, you will find many options.
Step 5 - Turn On the Wrap Text In Google Sheets: On scrolling down in the Cell option, you would find Wrap Text. The button beside it would be of black color. To turn on the text wrapping you will have to tap on that. It will turn blue to indicate that the wrapping is on now.
Like this, you can turn on and turn off text wrapping for the entire document. If you have only one specific row or column whose text has the probability to exceed the space, you can apply this function for that specific row or column also. When text wrapping is on, the text will automatically go to the next line. The cell's width is broadened because of text wrapping. It will affect the width of the entire row to keep up the uniformity even though it is just one cell whose text is large.
So, make your text clearly and readily visible by turning on the feature of text wrapping. Just go through these five steps and select appropriate options as shown in the images.